


✍️ The newsletter: Feedback for Conservators #6
A FREE digital tool for art conservators: The CRBMC Manuals

This newsletter project comes from the mentorship service Feedback for Conservators: a place to bring a little bit of professional feedback to help on subjects that I wish I knew more about, especially (but not only) at the start of my art conservator career. Topics discussed here are recurrent ones that I see over Zoom sessions! so I thought would be useful to address them in a short and more informal video format. In between, shorter posts with a digital free tool will be discussed. New publications will be out twice a month, for a year.
And just as a reminder: this is not a perfect newsletter and doesn’t intend to, but rather a space to offer some help. Read here past newsletters. And as aaaalways, some disclamers1
This is the third edition of this newsletter’s section dedicated to showcasing “free digital tools discoveries” for art conservators (see the past posts on Concepts and Figma). Today: the CRBMC manuals.
.
😎 CRBMC Manuals in a nutshell
This tool is a gem. I have been using it since my early times as a student and I LOVE it.
The CRBMC stands for Centre de Restauració de Béns Mobles de Catalunya = the Conservation Center for the Movable Cultural Heritage of Catalonia (Valldoreix, Spain). You can check some of the cool work that the Center does and shares regularly in RESCAT. You can follow them also.
Before diving in a little warning. This is a Creative Commons tool (CC BY-NC-ND 3.0 ES). It is important to understand what that means and which type of CC is (there are different types, but it does not simply mean that you can use it no matter what, I see repeatedly a lot of confusion on this matter). Also, this is something that was created without profit, just for the conservation community. It means that an institution and its professionals have put a lot of effort and money so other colleagues can work and enjoy it for free. If you have questions on how to use it or its limits, always ask them.
Among the different things they have promoted, one of the best is these manuals. They were created in the CRBMC by the paintings conservator Maria Sala Casanovas with the collaboration of other art conservators and colleagues from the Center, depending on their specialization (see each pdf manual for their names). It is quite a work!!
.
And what is this?
As they define it:
The manuals developed by the CRBMC are tools used to plot the technical reports of conservation and restoration. These manuals have been prepared by the need to unify criteria and to help practitioners graphically capture the different diseases and interventions in the works of art.
That means that these are libraries of established patterns to help you graphically represent digitally the damages of the artwork that you’re treating/studying. Those libraries can be usually added in Illustrator (a drawing program). Is not per se a program, but a complement to it. They create a manual on how to use it and they established a unified criteria (and words!) on how to represent those damages.
.
And how it works?
The complement has a manual + complements of damages patterns in 3 categories: if it is a large area, if it is a small and also the legends to put on your drawings. There are different manuals for each specialisation, and damages are grouped in each case by levels (support, ground layer, polychromy and main surface). As mentioned, all is installed on your Illustrator library.
Seems quite abstract but it is not, once you get it is extremely easy to use. Let’s work with an example: Imagine that you have a large area awfully re-gilded in a polychromed wooden sculpture, but also certain small areas too.
First, let’s see which speciality is about: They have created manuals for 5 main specialities (since each can have specific damages). I will pick “polychrome wood”, and install the complements + download the pdf manual, where all the damages are listed.
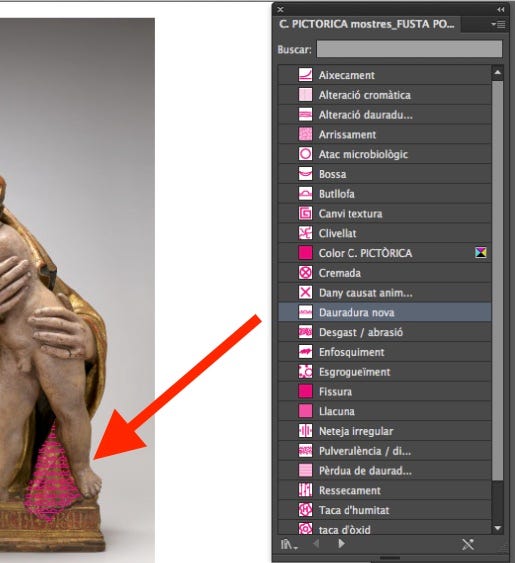
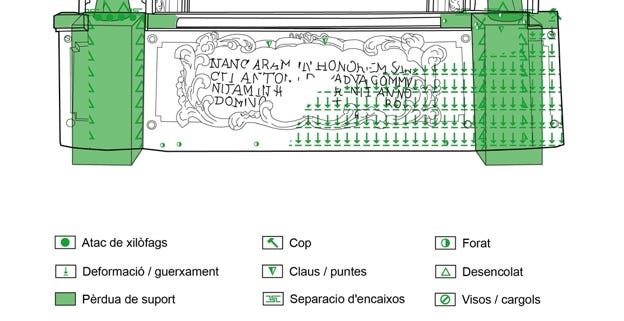
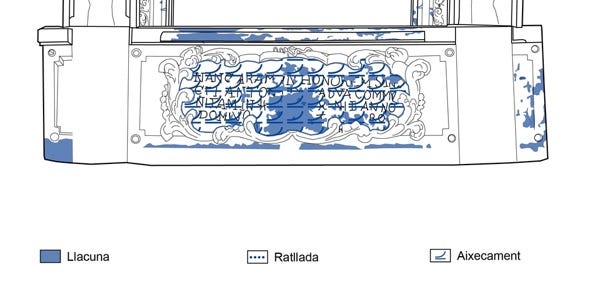
Then, the program establish 4 layers of diagnosis with a colour-code for each: support (damages will be indicated in green. Fig. 2), ground layer (damages will be indicated in blue Fig. 3), polychromy (damages will be indicated in pink Fig. 1), or superficial (here includes varnishes, dust etc, it will be indicated in orange). This division is linked to how diagnoses are carried out at CRBMC and mainly in Spain, but I know other countries that approach it differently. Can you use in single document damage of different layers? Yes, only the colour will change, see the example of these colleagues, Kreit Restauro. In this case, let’s go for polychromy (pink).
Once you choose the “layer” that you will diagnose, you have 3 different types of diagnose libraries. In each of them all the most common damages of the chosen specialisation and specific layer chosen are listed (so you do not have to think about it, just scroll to find the name of your damage and they already thought about a pattern for it. Fig.1.). And what is the difference between this 3 types of libraries? Following our example: I have a large area, so I will go to the library of “Mostres (=Patterns)” and choose “Dauradura nova (=new gilding)”. I will circle the area that is affected and the pattern is automatically applied (Fig.1). Since I also have a small area with it, I will then go to the second library, called “Símbols (=Symbols)” and search the same damage and just apply in a small area. Finally, I will click the third library “Símbols llegendes = Symbols for the legend” to pick the one that concerns me, “New Gilding” and I will put it at the end of the page, so everyone can understand what this pattern is about (Fig. 2 and 3). Recap: each library has the same list of damages, but each one for a different purpose (large area, small area and for creating your legend).
.
Why It is cool for art conservators
Because they thought about everything 😍
Fantastic if you want to work with large groups and not lose time establishing how everyone will carry out the damage drawings. Same if you work in a large collection of objects, composite objects or different materials but you want to use the same code of representation of your diagnosis.
The colours allow us to easily differentiate the level of damage, but also in combination how the damage affects all. Furthermore, even if you print it in black and white can be understandable (in my opinion).
You can use it at the top of an image (fig.1) or a drawing (fig. 2 and 3). I am a “Team Drawing”, which always is more clear.
There is a specific manual just for the installation, in case you’re lost.
.
Some thoughts
Although the manuals indicate the equivalence of the name of the damages in different languages (see page 4 of the manual), its application is for now in Catalan. This affects mainly the name in the legend, not the patterns per se, but they are listed with their Catalan name. For any modifications since the tool is from the CRBMC please enquiry them: let’s be cool 😎, especially when they did such a generous contribution!!
Always I recommend creating a layer for each damage type. Yes, you will end up with a lot of layers, but you will be quicker to apply changes and always could be useful for future publications or internal discussions to just pick one layer to be visible if you wish.
My advice is always the same: dedicate 1 hour to explore and then just stick to what you need. You must use it if it is saving you time on something, not making you lose it.
Enjoy!
.
That’s a warp for today. More in two weeks, see you then?

As mentioned, this newsletter supports the mentorship service Feedback For Conservators (here are some testimonials). Also, as part of it, I offer limited Pro-Bono sessions for those colleagues or students who can not afford them. If you’re interested in any of both just email me, promise I do not bite.
This is my opinion, which also means I could be wrong! You do you✨. Also, let’s be cool and not share extracts without my consent.
This is NOT a sponsored post, just my personal opinion of this program 😙.